P1S Printable Area
P1S Printable Area - You are misunderstanding what the exclusion area is. The bambu lab x1 is advertised as having a build volume of 256x256x256. There is a way to print full volume. While if you set your model wide, (left to right) to 256mm, you are limited to 228mm in depth. Be careful if you do use this piece as it'll try and cut the filament when you hit the 'unload' button on the machine. It’s the area where the filament cutter is activated on the side of the print head via the side of the printer.
Clear the excluded bed area in printer settings, and change the printable height from the default 250mm to 256mm. Be careful if you do use this piece as it'll try and cut the filament when you hit the 'unload' button on the machine. There is a way to print full volume. Here is the wiki article that explains it further. This page provides information about the p1 series printers related to quick start, print settings, troubleshooting, maintenance, firmware upgrading, etc.
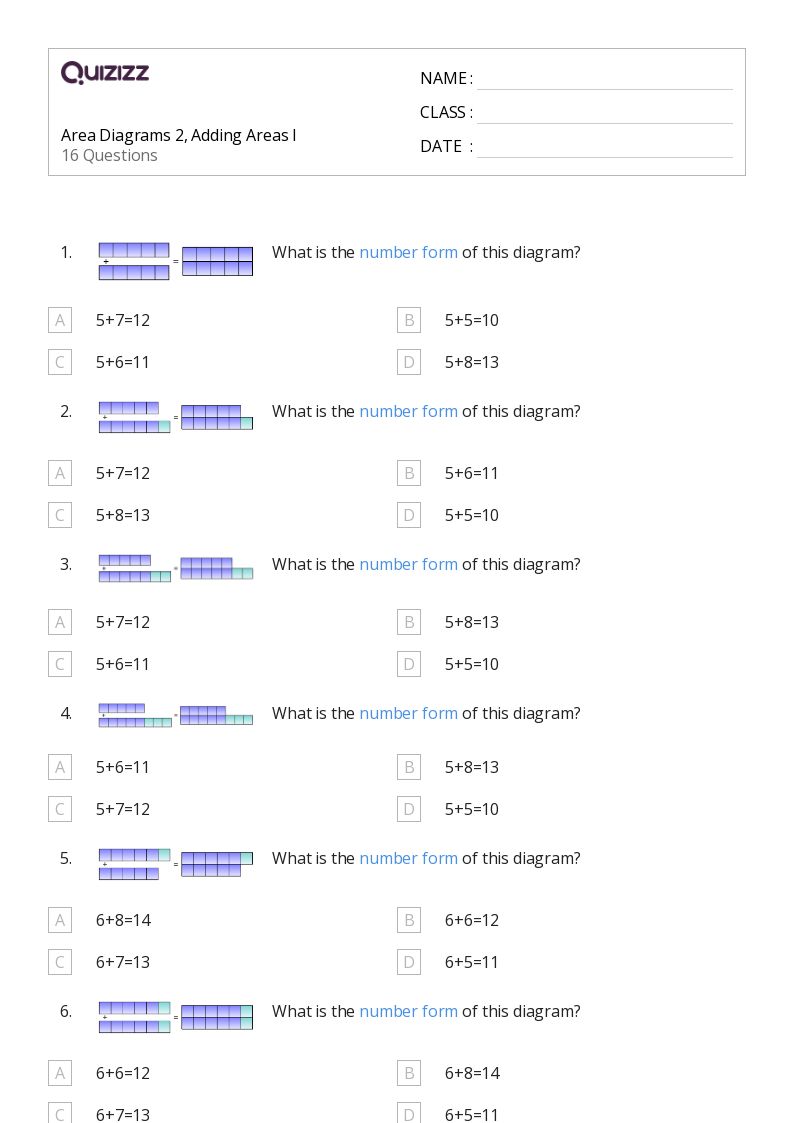
50+ Area worksheets for 1st Grade on Quizizz Free & Printable
The bambu lab x1 is advertised as having a build volume of 256x256x256. While if you set your model wide, (left to right) to 256mm, you are limited to 228mm in depth. Specs and major features of the bambu lab p1s 3d printer, including build volume, maximum print speed, and supported filament types. In case anyone out there hasn't seen.
Bambu Lab P1P full printable enclosure mod (P1X) by vier2acht

You get the most space with a rectangular model/arrangement using 256mm depth (front to back), and 238mm width. I thought that is the size of the largest part i can print (give or take a mm). To appease any sense of buyer’s remorse, bambu lab is offering a p1p to p1s upgrade kit for $150. Does anyone know what the.
Bambu Lab P1P "Vision" Enclosure by humebeam Download free STL

While if you set your model wide, (left to right) to 256mm, you are limited to 228mm in depth. I thought that is the size of the largest part i can print (give or take a mm). Find all p1 series articles by clicking. In case anyone out there hasn't seen these instructions from bambu on printing the full 256mm^3.
Super Mario Colouring Pages Free Printable

This step is to disable filament cutter protection. The only bl printer that can print a square of 250x250 without a cut out in the corner is the a1 (not mini). Thank you, printing the required level stopper tucker now. You'll need to print a small part that disabled the filament cutter to use the full x and y. You.
Bambu Lab P1P / P1S Heavy Duty Side Spool Arm by suit Download free

It is possible to make changes to the printer to get to that corner, bl has a wiki article about it. It prints near close to the edge of the bed sheet. For me, i found using magnets and attaching the bubble wrap to the frame of my p1p was good enough. In case anyone out there hasn't seen these.
P1S Printable Area - Build volume with z hop. The svg or png can be used as a background image or just a sanity check that a print will fit into the actual printable area of the p1 x1 build plate. It’s the area where the filament cutter is activated on the side of the print head via the side of the printer. You will want to insulate your chamber and try to keep the temps at the minimums stated in the filament cross reference. While if you set your model wide, (left to right) to 256mm, you are limited to 228mm in depth. Hey all, the printer is listed as having a 256x256x256 volume, but when trying to print a 250x250 part i get an error that the object is too close to the exclusion zone.
Be careful if you do use this piece as it'll try and cut the filament when you hit the 'unload' button on the machine. There are various g code editors to scale, rotate and generally alter g code files. It’s the area where the filament cutter is activated on the side of the print head via the side of the printer. It prints near close to the edge of the bed sheet. You will want to insulate your chamber and try to keep the temps at the minimums stated in the filament cross reference.
Thank You, Printing The Required Level Stopper Tucker Now.
While if you set your model wide, (left to right) to 256mm, you are limited to 228mm in depth. I thought that is the size of the largest part i can print (give or take a mm). For me, i found using magnets and attaching the bubble wrap to the frame of my p1p was good enough. This step is to disable filament cutter protection.
Clear The Excluded Bed Area In Printer Settings, And Change The Printable Height From The Default 250Mm To 256Mm.
But i'm trying to slice an object that is 247.6x201.9x39.8 and getting an error. To appease any sense of buyer’s remorse, bambu lab is offering a p1p to p1s upgrade kit for $150. As long as you do not turn off your printer, a bed leveling usually does not need to be repeated every print as it is stored in the printer and used for the next print. Hey all, the printer is listed as having a 256x256x256 volume, but when trying to print a 250x250 part i get an error that the object is too close to the exclusion zone.
You'll Need To Print A Small Part That Disabled The Filament Cutter To Use The Full X And Y.
The stl is a to scale model of the bbl p1s build plate. Is the max limit towards the front and right of the bed sheet?… We describe why the printer has partial volume limitations, and how you can go around that. Get colorful prints with easy plug.
This Page Provides Information About The P1 Series Printers Related To Quick Start, Print Settings, Troubleshooting, Maintenance, Firmware Upgrading, Etc.
You get the most space with a rectangular model/arrangement using 256mm depth (front to back), and 238mm width. Here is the wiki article that explains it further. It prints near close to the edge of the bed sheet. It’s the area where the filament cutter is activated on the side of the print head via the side of the printer.